
Workflows and automations make a program reflect how your organisation actually works. A workflow defines the stages your activities move through, and an automation lets the completion of work update your control scores automatically. Setting these up means your maturity stays in step with the work being done, without anyone re-scoring controls by hand. This article covers both.
Editing the workflow
On Strategy > Programs Dashboard, select the Edit Workflow button in the upper right to open the Build Workflow page. The page has three parts:
- Build Workflow: the workflow's name. Change the Workflow Name and click the Save button beside it to rename the workflow.
- Workflow Builder: your statuses, drawn as a flow diagram in which each status is a box and each arrow is a move an activity is allowed to make. Every workflow must include at least a To Do and a Completed status. Click a status to customise its name, colour, and transitions. Use Add Status to create more, and Reorder to change their order by dragging each status by its handle. A status with a lock icon cannot be moved or deleted. If activities are sitting on a status you archive or a transition you block, CyberHQ asks you to choose a status to move them to. Click Save to apply your changes, or Reset to discard them.
- Workflow Events: a history of the changes made to your workflow. Each entry shows what changed (for example a status added, renamed, archived or reordered, or a transition added, blocked or unblocked), who made the change and when. Older entries are on later pages.
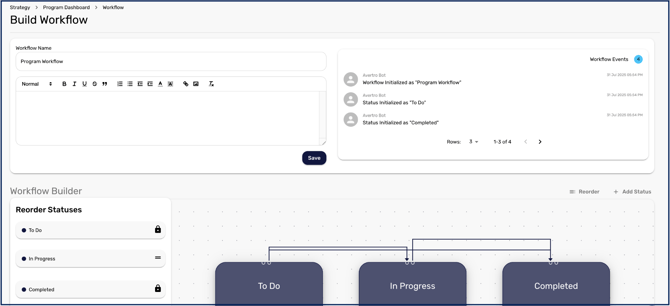
Tailoring the workflow lets you build in your own governance, for example by adding a Review status so an activity cannot be marked Completed until it has been reviewed.
Creating automations
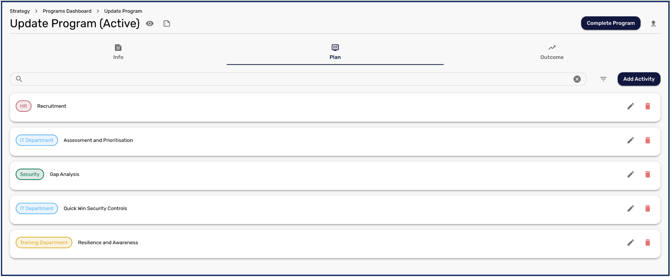
After saving an activity, you can define automations that change a control's response as the activity progresses. Open the activity from the program's Plan stage using the pencil icon beside it, go to its Automation tab, and click Add Automation.
- In the IF section, choose the status change or changes that trigger the rule: for each, the status the activity moves from and the status it moves to.
- In the THEN section, choose the controls to affect from any framework in your workspace and set the outcome for each.
Each saved rule is listed on the Automation tab with its name and the date and time it was saved. It reads as a sentence: If from status → to status, Then each control it affects, with its framework and the change it makes. For example, 4 → 5/5 means the control moves from a score of 4 to 5, out of a maximum of 5. Use the edit and delete buttons beside a rule to change or remove it. If a rule can't be deleted, an error message tells you so and the rule stays in the list.
An automation leaves alone any control that is marked Not Applicable, and any control linked to a Key Business System, because that control's answer is driven by the system.
The control picker lets you set the change control by control rather than applying one outcome across everything you have selected. Configuring an automation takes slightly longer as a result, but a single automation can move different controls to different scores — so you need fewer automations overall, and less unpicking later when one rule overwrites another.
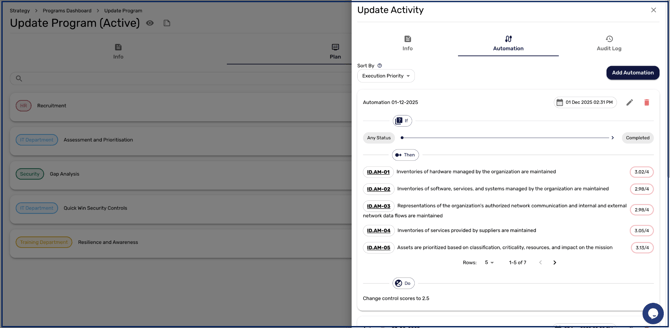
Use Sort By at the top of the Automation tab to choose how the rules are listed: Execution Priority lists the most recently updated first, and Execution Order lists the oldest first. Sort By only changes how the rules are listed. CyberHQ warns you if another automation in the program already changes the same controls.
Choosing which controls an automation affects
When building an automation you can select either subjective controls - the controls of your own framework, such as NIST or ISO - or objective controls from the Master Control Framework. Previously only subjective controls could be selected, which meant teams scoring objectively had to work out which Master Control Framework controls underpinned theirs and add those by hand. You no longer need to do that. Pick the controls in whichever framework you actually work in, and set the outcome for each.
Advancing an activity when an issue is resolved
Program activities can also be linked to issues. Once an issue has been saved, edit it, open its Strategies tab and click Add Automation. This option is locked until the issue has been created.
This closes the loop between remediation and delivery: the person resolving the issue updates the record they are actually working on, and the program board reflects it without anyone updating two places. These automations are set up on the issue itself rather than here; see How to Create an Issue.
With your workflow and automations set, your program runs the way your team works and keeps your control scores current as activities progress. Day-to-day tracking is covered in Understanding Program Management.