
Adding a new team member to your CyberHQ instance is a straightforward process managed directly from the Users settings page. Following these succinct instructions will ensure your new user is added successfully.
Adding individual users
- Navigate to the left-hand navigation menu and click on Settings > Users.
- In the Manage Users section, click on the Add User button.
- Enter the new user's required details, which include their First Name, Last Name, Email, and Job Title.
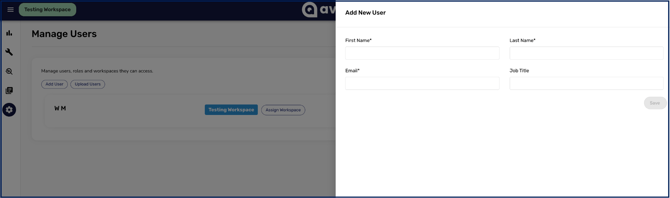
- Click Save to complete the process. You'll now see them in your Users List.
- The invited user will receive an email invitation with a join link to access your CyberHQ Workspace for the first time.
Once the newly invited team member has joined your workspace, they won't be assigned to other workspaces by default. To grant them access to specific areas of the platform, you will need to manually assign them to a workspace and define their roles.
If an email address is rejected, your workspace is most likely restricted to approved domains. An administrator can allow other domains, which is what you need when inviting a contractor or an external auditor who has no address on your company domain.
Note: Once a user has been granted access to a workspace, they appear in that workspace's user list even if their account sits in a parent workspace. See User and Workspace Settings Overview for how visibility works across a workspace hierarchy.
Uploading multiple users
- In the Manage Users section, click on the Upload Users button.
- Download the provided CSV template directly from the Upload Users page.
- Fill out the template with your team members' details, including their First Name, Last Name, Email, and Job Title, and indicate whether you would like to trigger an email invitation for them.
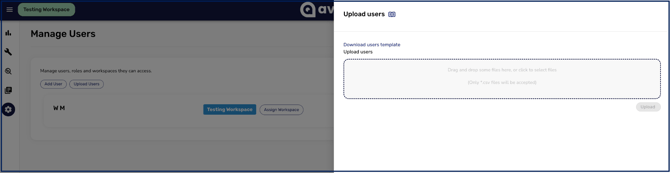
- Attach your completed template and select Upload to add all the new users to your platform.
Editing and archiving users
If you need to edit or archive a team member, select the pencil (edit) icon on the right-hand side of the user's record. This brings up a menu where you can edit their details, archive them, or block them.
Archiving and blocking are different. Archiving retires a user who has left, taking them out of your lists while preserving everything they did. Blocking suspends an account that still exists, for a user who should not sign in right now but is not gone. For a departure, archive. For a suspected compromise or a period of leave, block.