
The Risk Matrix tab is where you define how risk is scored and governed across your workspace, so it underpins every risk rating, severity band, and escalation decision the platform makes. The tab works as two layers that combine. Score bands set the colour fill of each cell, and a layer called Governance Zones sets the cell borders to show how each score sits against your organisation's risk tolerance and appetite. Configuring both accurately means the matrix reflects how severe a risk is, and whether it is acceptable, needs management attention, or must be escalated.
[NOTE: What was previously called “Risk Target” is now called Governance Zones. Your existing scores, severity bands, and matrix configuration carry through unchanged.]
To access this page, navigate to the left-hand menu and click on Settings > Risk, then select Risk Matrix within the Manage Risk Settings area.
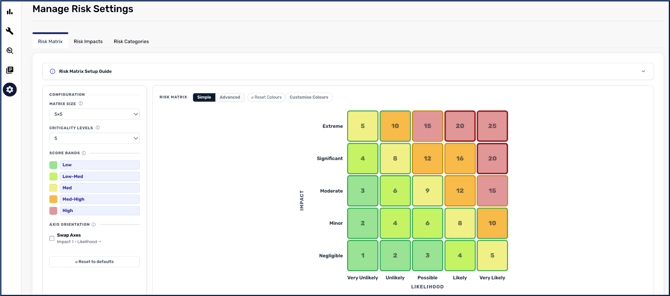
The matrix is built from a few structural settings on the left:
-
Matrix Size: Select either a 5x5 or a 6x6 grid to match the granularity your organisation works at. A 5x5 matrix produces risk scores from 1 to 25; a 6x6 produces scores up to 36.
-
Severity Levels / Score Bands: Define severity bands (e.g. Low, Low-Med, Med-High, High)and set default cell colours.
- Axis Orientation (Swap Axes): Switch which axis represents Impact and which represents Likelihood, so the matrix matches your enterprise convention.
- Scoring Mode: Set how cell scores are calculated. In Linear mode, impact increments by the base likelihood (2, 4, 6, 8, 10), with likelihood counting 1, 2, 3 and so on.
You then label and tune the axes:
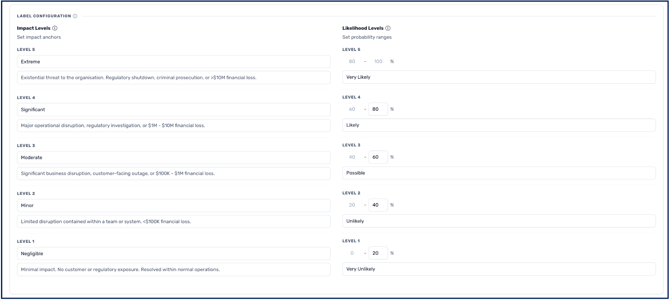
- Impact Labels (Y-axis) and Likelihood Labels (X-axis): Customise the text shown along each axis, for example Insignificant through Catastrophic.
- Likelihood Percentages: Assign a percentage range to each likelihood level. The first range starts at 0 and the last ends at 100, and each “from” value updates automatically from the previous “to”.
Scoring bands and governance zones do different jobs
These two settings are easy to confuse because they colour the same grid, so it is worth being clear on what each is for.
Scoring bands are how you describe risk.
They set the cell fill, and they are your vocabulary - Low, Medium, High, or a finer scale if you need one.
Governance zones are how you manage it.
They set the cell border, and they answer a different question: who needs to know about this? A risk can be High without needing to go to the board, and a risk can need to go to the board without being your highest-scoring risk.
The two connect through your severity levels. The more levels you define, the fewer scores fall into each band, and the more precisely you can place your governance thresholds. If you want only scores of 20 and above to escalate to the board, you need enough levels to draw that line cleanly.
Setting your cell colours
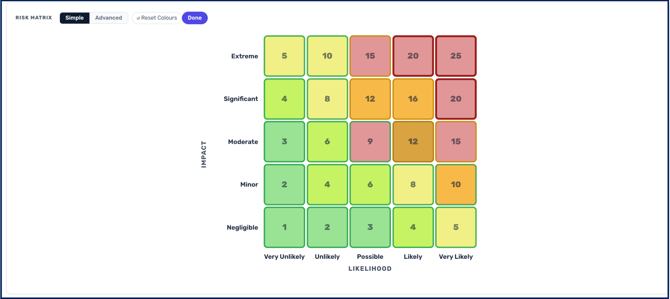
By default, your score bands set the colour fill of every cell. If you want a specific cell to display differently from its band, click Customise Colours and select the cell to override it manually. Reset Colours returns every cell to its score-band default. Because these colours communicate severity across the platform, set them to mirror how your organisation reads risk.
Setting your Governance Zones
Governance Zones sit on top of the cell colours and control the cell borders, mapping each score to one of three zones: within tolerance, within appetite, or above appetite.
Use the Simple / Advanced toggle to select preset or custom zone definitions.
-
Simple uses preset zone boundaries derived from your score bands, and suits most organisations.
-
Advanced lets you draw the zones yourself, and is the right choice when the preset boundaries do not match how your team actually judges a risk.
A common example: if your organisation treats any impact level 5 risk as critical regardless of likelihood, that is not a boundary a score-based preset will draw for you — Advanced lets you define it explicitly.
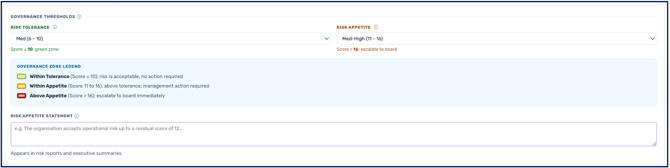
For context, a Risk Tolerance of “Low (1 to 4)” and a Risk Appetite of “Med-High (10 to 16)” would produce a zone legend along these lines:
- Within Tolerance (a score of 4 or below): the risk is acceptable and no action is required.
- Within Appetite (a score of 5 to 16): the risk is above tolerance and requires management action.
- Above Appetite (a score above 16): the risk must be escalated to the board immediately.
These thresholds directly drive escalation behaviour and the zone-based risk notifications, so they should reflect your real governance policy.
Appetite and tolerance
These two terms are routinely used interchangeably, and in CyberHQ they mean different things:
-
Risk appetite is the amount and type of risk an organisation is willing to pursue or accept in order to achieve its objectives.
-
Risk tolerance is the acceptable variation around those objectives — the boundaries within which the organisation is prepared to operate when risk is realised.
Appetite is the position you set deliberately; tolerance is the range you will live with in practice. Your governance zones express both on the matrix.
Recording your Risk Appetite Statement
Beneath the thresholds you can enter a Risk Appetite Statement, a short, plain-English description of the level of risk your organisation is willing to accept (for example, “The organisation accepts operational risk up to a residual score of 12”). This statement appears in your risk reports and executive summaries, giving stakeholders the governance context behind the numbers.
Once your matrix, colours, and Governance Zones are configured, every risk you score is automatically placed in the correct zone, which drives its severity, escalation, and how it appears in your Risk Register and reports. To set the tolerance level for each individual risk category, continue to the Risk Categories tab.
Risk prefixes:
you can set a prefix applied to your risk identifiers, so risks carry a reference matching your own numbering convention.
Tip: After configuring your matrix, click Save even if you have only changed the governance zones. The zone shading is applied across the platform on save, so matrices shown elsewhere in CyberHQ will not pick up your configuration until you have saved here.